X1 Stealth Gen 3: Error codes
X-Series Error Codes
Please Check Your App/ Peripherals
Display/Controller Error
Error 30
Description: "Please check your app/ peripherals" error is a communication error and means that the display and the controller cannot establish a connection.
Symptoms: "Please check your app and Peripherals" or "Display/Controller Error" on the SW102/ DS103 display and/or on the Ride Control app. This is often paired with the battery level indicator on the display flashing.
Please note that the controller would automatically be in Street mode, assist level 3 if there is such an error. The motor would still be able to run in such a condition.
Solution: Ensure the display and the 1T1, 1T2, or 1T4 wiring harness is properly connected. Check the display and either replace the wiring harness, display, or controller.
Steps:
- Inspect the 1T2, 1T2, or 1T4 connectors especially the pins to check for any damage and bent pins.
Checking for bent pins or if pins may have been bent and bent back is crucial as this is could result in the error. You need to inspect the female side of the connectors as well for dents as this is an indication that the connectors were forced in. If there are signs that the pins or connectors are damaged, replace the wiring harness only. Otherwise, continue to step 2. - If you have another CYC kit or have sufficient additional spare parts, swap out the display to see if the error goes away with the other display. You can also swap out the wiring harness. If you can locate the issue by swapping out components, then you can report your findings directly to CYC or an Authorised Reseller to organize a replacement (i.e. you do not need to continue troubleshooting).
*If you do not have any spare parts, continue to step 2 below.
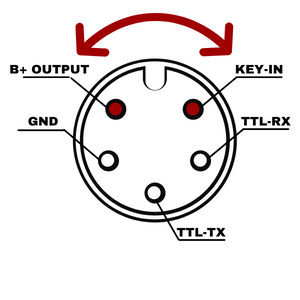
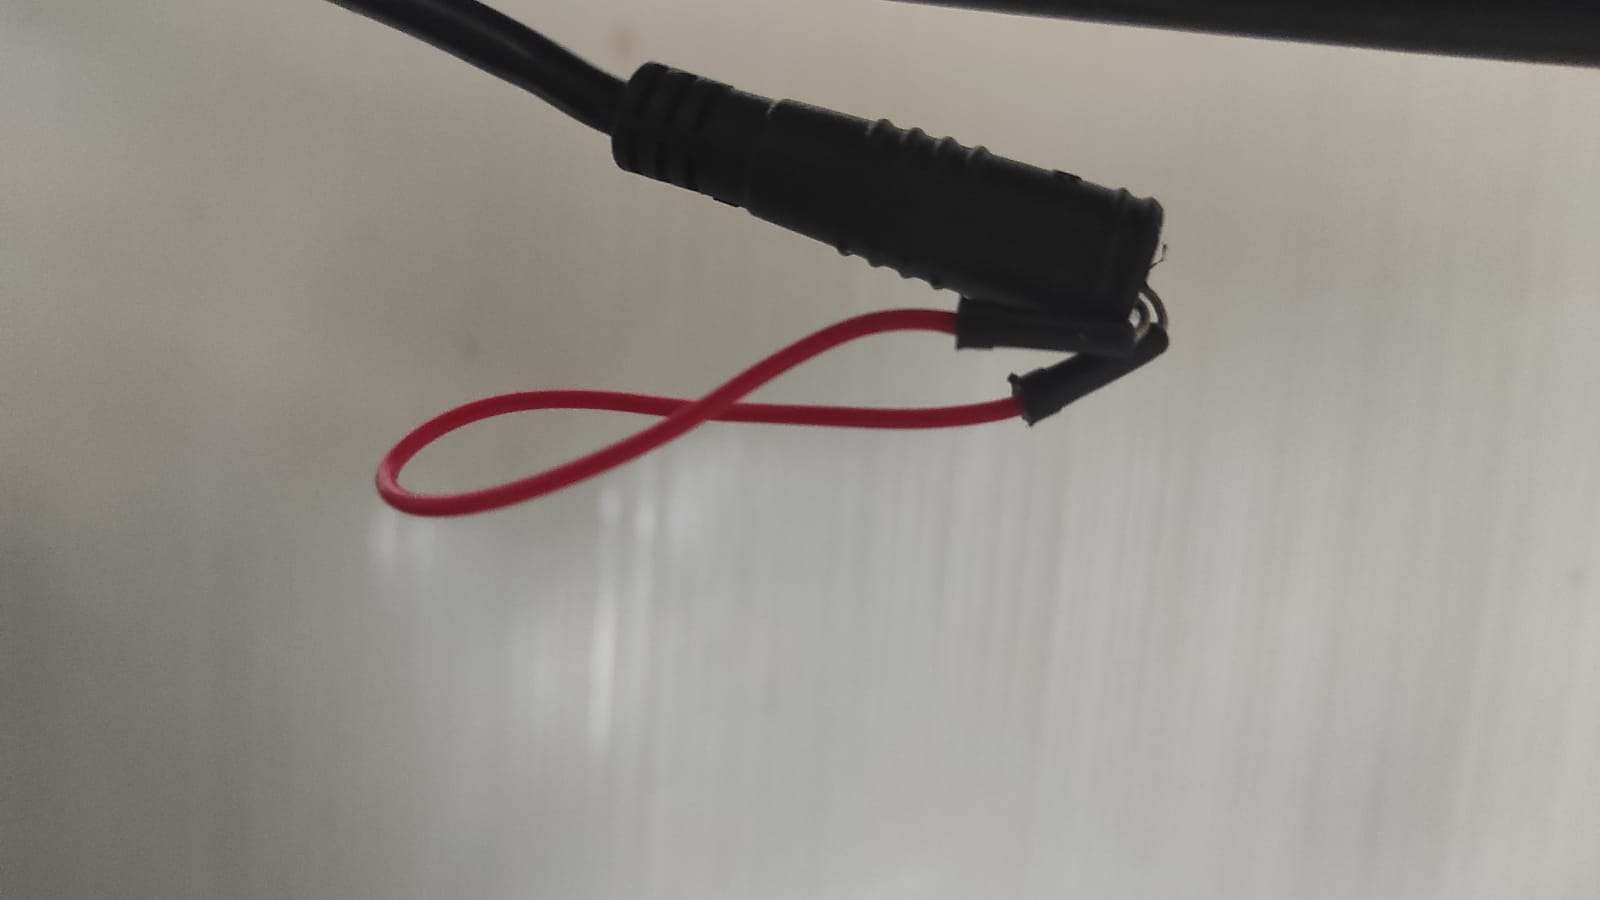
WARNING: The below steps should be exercised with care. Mistakes may cause additional issues. You may choose to send your components to CYC or an Authorised Reseller for testing instead. - Unplug the display and short-circuit the B+ & Key-In pins using a Dupont wire. See the diagram below for reference.
- Attempt to connect to the CYC Ride Control app.
- Lift the rear wheel and press in the throttle.
*WARNING: Lift the rear wheel BEFORE attempting to press the throttle as the system will be in the highest assist level by default. - If the motor does not function with the Dupont wire, and the wiring harness has also been checked, replace the controller.
Warranty condition: If the motor in question is still within its warranty period and there is no indication that the motor has been altered physically (such as cutting wires), then the components needed will be replaced under warranty.
*Wiring or connection damage as a result of bent pins or damaged connectors will NOT be warranted.
B. Lost Controller Connection
Symptoms: Flashing battery indicator often paired with being unable to connect to the app.
Solution: If possible, swap out the display and BLE speed sensor to ensure that this is not coming from the peripherals. If swapping the peripherals does not solve the issue, you will need to replace the controller. In most cases, this is as a result of the controller but it's always best to rule out the possibility of the cause being the peripherals.
Steps:
- Get evidence of
- Display showing "Please check your app/ peripherals" error
- Display showing battery level indicator flashing/ showing 0
- Unable to connect to The CYC Ride Control app
- Swap display and BLE speed sensor
- IF not solved with a peripheral swap, replace the controller
Error 01 & 02 - Controller Over/ Under Voltage
Description: Error 01 & 02 or "Controller Over/ Under Voltage" means that the battery voltage is over/under the system threshold.
Symptoms: Error code 01/02 or Controller Over/ Under Voltage on the SW102/ DS103 display and/ or on the Ride Control app. The motor will not run while the error is shown.
Solution: Adjust the battery settings in the Ride Control app or in the display's settings menu.
Steps:
- Connect to the CYC Ride Control app.
- Enter the app's battery settings section.
- Adjust the "Series of cells" setting to match your battery pack's nominal voltage.
- Save the settings change.
Please note that the X1 Stealth Gen 3 is only compatible with 36V to 52V nominal battery packs.
Warranty condition: N/A
Error Code 06 - Motor Over Temperature
Description: Error code 06 or "motor over temperature" means that the motor temperature reading is over the threshold. This can be caused by various reasons:
The temperature sensor is malfunctioning
Symptoms: Error code 6 or Motor Over Temperature text along with abnormally high motor temperature reading on the SW102/ DS103 display and/ or on the Ride Control app. The motor will not run while the error is shown.
Solution: Unless there are other symptoms not mentioned above, replace the motor component directly.
Steps (for X1 Pro and Photon):
- Get evidence of
- Error code on display and/ or app
- Motor temperature reading on display/ app
- Replace motor
Steps (for X1 Stealth):
- Get evidence of
- Error code on display and/ or app
- Motor temperature reading on display/ app
- Check the Apps setting in Modes & Level.
Confirm the Motor Type is correct, X1 Stealth Gen1/ Gen3
(Ride Control App User Guide, Page 9 )
- If the issue remains the same, Replace the motor
Warranty condition: If the motor in question is still within its warranty period and there is no indication that the motor has been altered physically (such as cutting wires), then the components needed will be replaced under warranty.
Error Code 09 - Controller Internal Error 10
Description: Error code 09 means that XXX.
This can be caused by various reasons: XXX
Symptoms: Error code 9 or XXX text along with XXX reading on the SW102/ DS103 display and/ or on the Ride Control app.
The motor will not run while the error is shown.
Solution: Unless there are other symptoms not mentioned above, replace the controller component directly.
Error Code 15 - Controller Internal Error 4
Description: Error code 15 means that XXX.
This can be caused by various reasons: XXX
Symptoms: Error code 15 or XXX text along with XXX reading on the SW102/ DS103 display and/ or on the Ride Control app.
The motor will not run while the error is shown.
Solution: Unless there are other symptoms not mentioned above, replace the controller component directly.
Error Code 16 - Controller Internal Error 5
Description: Error code 16 means that XXX.
This can be caused by various reasons: XXX
Symptoms: Error code 16 or XXX text along with XXX reading on the SW102/ DS103 display and/ or on the Ride Control app.
The motor will not run while the error is shown.
Solution: Unless there are other symptoms not mentioned above, replace the controller component directly.
Error Code 17 - Controller Internal Error 6
Description: Error code 17 means that XXX.
This can be caused by various reasons: XXX
Symptoms: Error code 17 or XXX text along with XXX reading on the SW102/ DS103 display and/ or on the Ride Control app.
The motor will not run while the error is shown.
Solution: Unless there are other symptoms not mentioned above, replace the controller component directly.
Error Code 18 - Controller Internal Error 7
Description: Error code 18 means that XXX.
This can be caused by various reasons: XXX
Symptoms: Error code 18 or XXX text along with XXX reading on the SW102/ DS103 display and/ or on the Ride Control app.
The motor will not run while the error is shown.
Solution: Unless there are other symptoms not mentioned above, replace the controller component directly.
Error Code 26 - Hall Sensor Error
Description: Error code 26 or "Hall Sensor Error" means that the motor's hall sensor is malfunctioning. This can be caused by various reasons:
- The motor hall sensor failure
- The motor hall sensor is disconnected
- Another sensor is causing the error
Symptoms: Error code 26 or Hall Sensor Error text on the SW102 display/ DS103 display and/ or on the Ride Control app. The motor will switch to sensorless mode automatically. The motor will continue to run in this condition.
Solution: Troubleshoot the other sensors especially if there is another error or other symptoms present. Once all sensors are checked and unless there are other symptoms, replace the motor component. There is a possibility that the controller is causing the error. Replace the controller only after the motor has been replaced and the error still persists.
Hall Sensor Calibration Password
Password: 32531
Please refrain from sharing this password unless needed. Incorrectly changing settings that require this password may result in issues/ damages that will not be warranted. Always reach out to CYC or an authorized distributor to ensure you are changing the correct settings if needed.
Steps:
- Inspect all connectors especially the pins to check for any damage and bent pins.
Checking for bent pins or if pins may have been bent and bent back is crucial as this is could result in the error. You need to inspect the female side of the connectors as well for dents as this is an indication that the connectors were forced in. If there are signs that the pins or connectors are damaged, replace the wiring only. Otherwise, continue to step 2. - Unplug the hall sensor (motor wire marked with red). Restart the kit, and test ride. Note that sensorless mode will kick in automatically so it is safe to test ride via throttle and pedal assist. If the system is operating as normal, then proceed to step 5 and replace the motor.
- Do a complete sensor check if the motor is still not operating:
*If any of the sensors below remove the hall sensor error, replace the applicable sensors. - Unplug brake sensors (if applicable), restart the kit, and check if the hall sensor error is still present.
- Unplug the speed sensor, restart the kit, and check if the hall sensor error is still present. If the speed sensor error or error 29 appears on the display, this is normal. We are only monitoring the hall sensor error.
- Unplug the throttle, connect to the CYC Ride Control app, and disable the throttle in the throttle settings section, save the changes. Then, restart the kit and check if the hall sensor error is still present.
- Unplug the torque sensor, restart the kit, and check if the hall sensor error is still present.
- If possible, swap out the 1T1, 1T2, or 1T4 wiring harness with another one to check if the hall sensor error is still present.
- If there is no change from either of the sensors or the wiring harness, proceed below.
- Get evidence of
- Error code on display and/ or app
- Replace motor
*Servicing video pending - Replace the controller if the motor replacement does not solve the issue
*Servicing video pending
Warranty condition: If the motor in question is still within its warranty period and there is no indication that the motor has been altered physically (such as cutting wires), then the components needed will be replaced under warranty.
*Wiring or connection damage as a result of bent pins or damaged connectors will NOT be warranted.
Error 21H
Description: Error 21H indicates a settings issue or controller malfunction.
Symptoms: Error 21H is shown on the 500c/ 750c display with no power output via throttle or pedal assist.
Steps:
- Connect to the CYC Motor (BAC) app.
- Go to the settings >> Peripherals Setup >> Motor Settings
- Check that "Instant Resume" is enabled.
- If not enabled, enable parameter and save to flash
- Power the display off, and on again (i.e, restart),
- If the error persists, we need to further search for signs of controller related issue
Warranty condition: If the kit in question is still within its warranty period and there are no indications of physical alternations or damage that could contribute to the error, then the components needed will be replaced under warranty.
Error 22H
Description: Error 22H is a throttle error, which can be caused by settings, throttle failure, or the controller.
Symptoms: Error 22H is shown on the 500c/ 750c display with no power output via throttle or pedal assist.
Solution: Depends on cause
Steps:
- Connect to the CYC motor (BAC) app and check that your "Throttle Fault Range" underneath the "Throttle" settings page is set to approx. 0.4V. If not, please change it to 0.4V and save it to Flash. Restart the kit and check if the error goes away. If yes, you can stop troubleshooting here and continue riding as normal. If not, please proceed with the below steps.
- Inspect the condition of all connectors. Unplug the throttle connector. Check for any visible damage on the connector pins and plug the throttle back in.
- If no visible damage is found, connect to the CYC Motor (BAC) app.
- Go to Settings >> Pedal Assist >> Hardware Input Information.
- Change “Control Command Source” to Pedal Sensor & save to Flash.
- Unplug the throttle, restart the bike, & test that there is power output via PAS.
- If there is power via PAS and no error, issue a replacement throttle
- If error 22H persists and/ or there is no power via PAS, we need to further search for signs of a controller-related issue
Warranty condition: If the kit in question is still within its warranty period and there are no indications of physical alternations or damage that could contribute to the error, then the components needed will be replaced under warranty.
Error 24H
Description: Error 24H is a hall sensor error, which can be caused by the hall sensor failing either on the controller side or the motor side, or the hall sensor not connected. In some cases, other peripherals may also cause this error.
Symptoms: Error 24H is shown on the 500c/ 750c display with no power output via throttle or pedal assist.
Solution: Connect the hall sensor correctly or replace the necessary component/s.
Steps:
- Ensure the hall sensor is connected properly. If you have newly installed or made changes to your kit, please ensure that the torque sensor and hall sensor are not swopped around as this will trigger the error.
- Turn on the kit and connect to the CYC (BAC) app.
- Go to your Peripheral Setup settings and change the "Motor Position Sensor Type" underneath the "Motor Settings" to "Sensorless" mode then save to Flash.
- Next, change the assist level on your display to 1 or higher and test the throttle.
- Now, kindly test the PAS. Please note that pressure needs to be applied to the pedals for PAS to engage. If you are testing it on a bike stand, please hold the brake levers slightly while testing PAS.
- If PAS and throttle work respectively, issue a motor replacement. If not, continue to do a sensor check.
Warranty condition: If the kit in question is still within its warranty period and there are no indications of physical alternations or damage that could contribute to the error, then the components needed will be replaced under warranty.
Error 30H
Error 30H is a communication error between the controller and the display which can be caused by various aspects.
Check 1:
- Confirm all the cable connections are secured and in good condition. You can ask the user to unplug the cables and plug them back in.
- Ask if the user has another controller, display, or 1-2/ 1-4 wiring harness that can be used to swap out the current one
- Please connect to the CYC app. Send us a screenshot of the app's dashboard, modes & levels page, and the app's warning page (attached user guide)
Notice to add in: If the error 30H only appears upon startup but then goes away, this is completely normal
Check 2:
Please note that this could be due to the display failing the controller giving issues or the user's battery not giving power. The most likely reason is either the display or the controller. We always check the display 1st:
- Unplug the display & short-circuit the B+ & Key-In pins using a bypass plug (attach reference images)
- You should be able to connect to the CYC app now & go to Peripheral Setup settings >> Disable Display >> turn this setting "On" & save to Flash.
- Test ride as normal & note that the bike will now be on permanently until the bypass plug or battery is disconnected.
- If the display is an issue, the bike will work as normal with the pins short-circuited (assist levels no longer relevant)
- Note that you may continue to ride with the bypass plug until you have received the replacement display. It's completely fine & won't void the warranty or cause any issues.
If the bike does not work, check your battery, & check if the controller's LED is on. If your battery is fine & checked, then the issue is most likely with the controller. In this case, the user needs to send back the controller for analysis.
Hall Sensor
Thanks for letting us know about the hall sensor error. Kindly note the below:
If you have newly installed or made changes to your kit, please ensure that the torque sensor and motor wire are not swopped around as this will trigger the error. Please refer to the image attached for reference.
If the wires are correct & you are still experiencing this error, please follow the steps below & let us know the result:
- Please turn on the kit & connect to the CYC (BAC) app.
- Ensure that you have switched to Race mode.
- Go to your Peripheral Setup settings & change the "Motor Position Sensor Type" underneath the "Motor Settings" to "Sensorless" mode then save to Flash.
- Next, change the assist level on your display to 1 or higher & test the throttle.
- Now, kindly test the PAS. Please note that pressure needs to be applied to the pedals for PAS to engage. If you are testing it on a bike stand, please hold the brake levers slightly while testing PAS.
Please let us know if both PAS & throttle work in sensorless mode. If yes, we will arrange a motor replacement for you ASAP.
If the error persists after changing the Controller - Sensor Check for ASI
*Guideline for troubleshooting only (do not copy as is)
1. Unplug the speed sensor & then restart the kit. Confirm if the result is the same or different.
2. Unplug the brake sensors (if applicable) & then restart the kit. Confirm if the result is the same or different.
3. Unplug the torque sensor & then restart the kit. Please confirm if the result is the same or different.
4. Unplug the throttle, & change "Control Command Source" to "Pedal Sensor" only & save to flash. Next, restart the kit. Confirm if the result is the same or different.
5. Next, hall sensor (run sensorless)
6. Phase wires
7. Keep sensors plugged out.
500C Display Error Codes (Similar to Display 750C)
Error 21H => Check Error Code Appear on Apps
ERROR CODE NEEDED, PLEASE SEND PROPER AIR CODE FOR MOTOR OVERHEATING
Turn off NTC and check the error code on the app
IMPORTANT: Please refrain from sharing this password unless needed. Incorrectly changing settings that require this password may result in issues/ damages that will not be warranted. Always reach out to CYC or an authorized distributor to ensure you are changing the correct settings if needed.
Disable temp sensor password: 32531